How To Clean Wood Floors? 5 Easy Steps!
Advices on cleaning hardwood floors are confusing. One person swears by vinegar. Another says it’ll ruin your floors. Someone recommends steam mopping while another calls it a disaster waiting to happen.
The truth is, you’re not confused because you’re doing something wrong. The advice is genuinely contradictory because not all hardwood floors are the same.
This guide will help you understand what type of floor you have and exactly how to clean it safely. If you’re wondering how to clean hardwood floors without risking damage, this guide clarifies what really works. You’ll also get practical hardwood floor cleaning tips you can use immediately.
How to Clean Wood Floors
Table of Contents
- Step 1 — Identify Your Wood Floor Type
- Step 2 — Gather Your Cleaning Tools
- Step 3 — Daily and Weekly Cleaning Process
- Step 4 — Removing Spills & Stains
- Step 5 — Deep Cleaning (Monthly or Quarterly)
- Common Mistakes That Damage Wood Floors
- Wood Floor Cleaning Dos and Don’ts
- Your Simple Maintenance Checklist
- Frequently Asked Questions
Step 1 — Identify Your Wood Floor Type
- Not all wood floors are the same. The type of floor you have determines which cleaning methods and products will work best.
Solid Hardwood Floors
- These are made from solid pieces of wood throughout. They’re durable and can be refinished multiple times over their lifetime. Solid hardwood responds well to most gentle cleaning methods, but it’s particularly sensitive to excess water.
Engineered Wood Floors
- Engineered floors have a real wood veneer on top with layers of plywood or composite underneath. They’re more stable in humid conditions than solid hardwood, but the thinner top layer means you can’t refinish them as many times. Clean them gently to preserve that top layer. For engineered wood floor cleaning, stick to light, non-saturating methods approved by the manufacturer.
Finish Types Matter Too!
- Your floor’s finish is just as important as the wood itself. Most modern floors have a polyurethane or lacquer seal that protects the wood. These sealed floors can handle a bit more moisture during cleaning.
- Older floors might have oil or wax finishes instead. These finishes require special care because water and standard cleaners can damage them. If you’re not sure what finish you have, check with your flooring manufacturer or test a small hidden area first.
- Understanding your floor type helps you avoid damage and keeps your floors looking beautiful for years.
Step 2 — Gather Your Cleaning Tools
- Having the right tools makes cleaning wood floors easier and safer. Here’s what you need before you start.
Essential Cleaning Tools
- A soft bristle broom or dust mop works perfectly for daily sweeping. These tools pick up loose dirt without scratching the floor surface.
- Get a vacuum with a hard floor setting or attachment. Make sure the beater bar can be turned off, as spinning brushes can scratch wood. A good vacuum removes fine dust that brooms might miss.
- A microfiber mop for hardwood floors is your best friend for wet cleaning. Microfiber pads trap dirt effectively and don’t scratch. They also wring out well, which means less water on your floors.
- You’ll also need a pH neutral wood floor cleaner. Look for products specifically designed for wood. These cleaners won’t strip the finish or leave sticky residue. Below, we explain how to choose the best cleaner for hardwood floors.
- Keep soft cleaning cloths or towels handy for drying and spot cleaning. Clean, dry towels prevent water from sitting on the floor too long.
- You can see product details here.
Tools to Avoid
- Skip the traditional string mop. These hold too much water and can damage wood floors over time.
- Don’t use steam mops unless your floor manufacturer specifically approves them. The heat and moisture from steam can warp wood and damage finishes. (If you’re wondering, can you use steam mops on hardwood floors? Only if the manufacturer explicitly says yes.)
- Avoid abrasive scrubbers, steel wool, or rough brushes. These scratch the floor finish and create spots where dirt can collect.
- Stay away from oil soaps, ammonia, bleach, or all purpose cleaners not made for wood. These products can dull the finish or cause permanent damage.
Step 3 — Daily and Weekly Cleaning Process
Daily Maintenance (5 Minutes)
- Step 1: Sweep or Dust Mop High-Traffic Areas Focus on entryways, kitchens, and hallways. Use a soft-bristle broom or microfiber dust mop to capture dust and dirt.
- Step 2: Wipe Up Spills Immediately This is critical. Liquids, especially acidic ones like juice, wine, or pet urine, can damage the finish and stain the wood if left to sit. Use a soft, dry cloth for quick cleanup.
Weekly Maintenance (15-20 Minutes)
- Step 1: Vacuum Thoroughly Use your vacuum’s hard floor attachment (no beater bar). Pay attention to corners, edges, and areas under furniture where dust accumulates.
- Step 2: Light Damp Mopping (Sealed Floors Only) Prepare your pH-neutral cleaner in a spray bottle. Here’s the key: never saturate wood floors with water. Use a damp mop, not a wet one, and dry immediately to prevent warping, cupping, or swelling.
- Lightly mist a small section (about 3×3 feet), then wipe with a well-wrung microfiber mop. Work in sections to prevent the cleaner from drying on the floor.
- Step 3: Dry Immediately Always follow with a dry microfiber cloth. This prevents water spots and removes any remaining moisture.
Step 4 — Removing Spills & Stains

- If you’re asking how to remove stains from hardwood floors, remember that different spills need different approaches. Here’s how to handle common problem spots safely.
General Stain Removal Principles
- Act fast. The sooner you address a stain, the easier it is to remove.
- Always test cleaners in a hidden area first.
- Blot, don’t rub. Rubbing can spread the stain and damage the finish.
- Start with mild solutions and only use stronger ones if necessary.
- Regular light cleaning prevents dirt buildup and keeps your floors looking fresh. Here’s how to maintain them with minimal effort.
Grease and Oil
- Blot up as much grease as possible with paper towels. Then clean the area with a barely damp cloth and a tiny drop of dish soap. Rinse with a clean damp cloth and dry immediately. The key is using very little water and soap.
Sticky Substances
- For sticky spills like juice or soda, use a damp cloth with your regular wood floor cleaner. Gently work the cloth over the sticky area until it lifts. Avoid scrubbing hard, which can dull the finish. Dry thoroughly when done.
Pet Accidents
- Clean pet messes right away to prevent staining and odor. Blot up the liquid, then clean with an enzyme based cleaner made for wood floors. These cleaners break down organic matter without damaging wood. Avoid vinegar or harsh chemicals that can react with pet waste.
Scuff Marks
- Most scuff marks come off with a tennis ball. Rub the mark gently with the tennis ball, and it should disappear. For stubborn scuffs, use a small amount of baking soda on a damp cloth. Rub gently, then wipe clean and dry.
Gum and Wax
- Place an ice cube in a plastic bag and hold it against the gum or wax until it hardens. Then carefully scrape it off with a plastic scraper or credit card. Never use metal scrapers that can gouge the wood. Clean the area afterward with your regular method.
Ink and Dark Stains
- Try rubbing alcohol on a soft cloth for ink stains. Dab gently rather than rubbing. For deeper stains that won’t come out, you might need professional refinishing. Don’t use harsh chemicals or excessive scrubbing, as these can make the problem worse.
Step 5 — Deep Cleaning (Monthly or Quarterly)
- Your floors need a more thorough cleaning every month or quarter, depending on foot traffic.
Preparation
- Remove all furniture and rugs from the area. Sweep and vacuum the entire floor thoroughly. This ensures you’re deep cleaning, not just spreading dirt around.
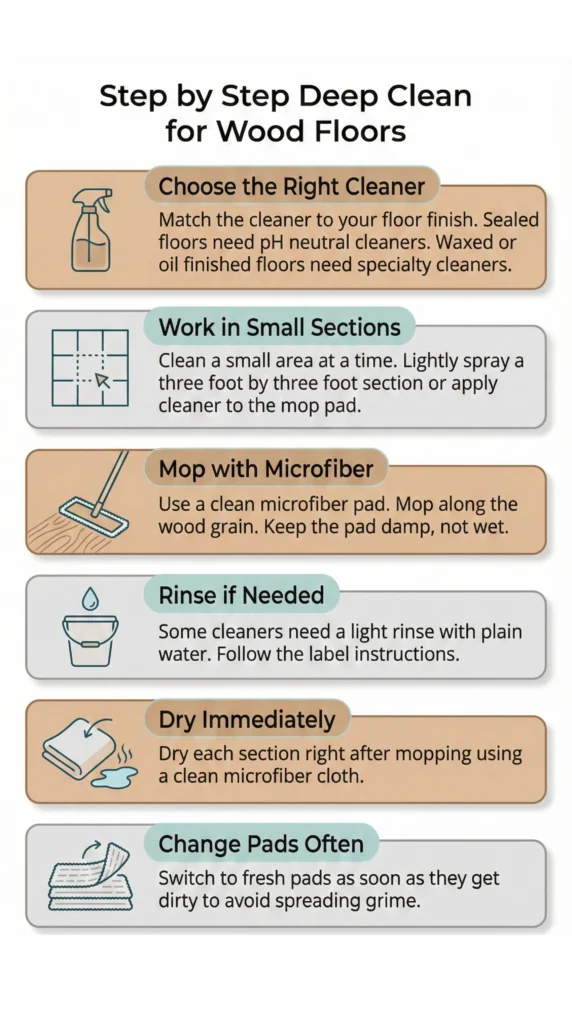
Deep Cleaning Process
- Step 1: Choose the Right Cleaner Make sure your cleaner matches your floor’s finish. Polyurethane floors need different products than waxed or oil-finished floors.
- Step 2: Work in Small Sections Lightly spray a 3×3 foot section directly onto the floor (or onto your mop pad, depending on product instructions). Working in small sections prevents the cleaner from drying too quickly or saturating the wood.
- Step 3: Mop with the Grain Use a clean, damp microfiber mop. Always mop in the direction of the wood grain. This gives the best results and prevents streaks.
- Step 4: Rinse and Dry Some cleaners require a light rinse with plain water. Always check the product instructions. Follow immediately with a clean, dry microfiber cloth to remove all moisture.
- Step 5: Switch to Clean Pads As your mop pad gets dirty, switch to a fresh one. Using dirty pads just spreads grime around instead of removing it.
Prevention Tips
- Place doormats at every entrance. These catch dirt and moisture before it reaches your wood floors. Clean the mats regularly so they keep working effectively.
- Use area rugs in high traffic zones. Rugs protect the floor finish and make cleaning easier. Just make sure rug pads underneath are safe for wood floors.
- Ask family and guests to remove shoes indoors. This simple habit dramatically reduces the amount of dirt and grit on your floors.
Common Mistakes That Damage Wood Floors
- Avoiding these mistakes protects your investment and keeps floors beautiful longer.
Using Too Much Water
- This is the biggest mistake people make. Wood and water don’t mix well. Excess water seeps between boards, causes swelling, creates cup shaped warping, and damages the finish. Always wring out your mop until it’s barely damp.
Wrong Cleaning Products
- All purpose cleaners, window cleaners, and harsh chemicals strip the protective finish. They leave floors looking dull and unprotected. Stick with cleaners specifically made for wood floors.
The Vinegar Debate
- Many websites suggest vinegar as a natural cleaner. While vinegar does clean, it’s acidic and can dull or damage floor finishes over time. Some manufacturers warn against it explicitly. If you choose to use vinegar, dilute it heavily (1/2 cup per gallon of water) and don’t use it regularly. pH neutral cleaners are safer.
Skipping the Sweep
- Mopping without sweeping first just moves dirt around. Worse, grit under the mop can scratch the floor as you clean. Always remove loose debris before wet cleaning.
Ignoring Manufacturer Guidelines
- Your flooring came with care instructions for a reason. Different finishes have different needs. Check your warranty too, as some warranties become void if you use unapproved cleaning methods.
- Maintaining the right indoor environment is just as important as regular cleaning when it comes to protecting hardwood floors. Wood expands and contracts as humidity changes — extreme swings can cause warping, gaps, cupping, or cracking. How to Maintain Stable Wood Floors Year-Round Keep indoor humidity between 35%–55%.
- Humidity above 55% can cause boards to swell and cup; below 35% can lead to shrinking and seasonal gaps. Use humidifiers or dehumidifiers as needed. Maintain temperatures around 60°F–80°F.
- Sudden temperature changes stress both wood fiber and the floor’s finish. Improve ventilation in moisture-heavy areas.
- Use exhaust fans in kitchens and bathrooms to prevent high localized humidity. Protect entry points from weather fluctuations.
- Entry mats, weather stripping, and draft sealing prevent sudden moisture or heat exposure near doors and windows.
- Why this matters: Stable humidity and temperature reduce the chances of cupping, gapping, cracking, and finish failure — significantly prolonging the life of your hardwood floors.
Wood Floor Cleaning Dos and Don’ts
Special Cleaning Situations
- Some floors and situations need extra attention. Here’s how to handle them.
Homes with Pets
- Clean up pet hair and dander more frequently. Daily sweeping helps, and a vacuum with a HEPA filter captures allergens better.
- Use pet safe wood floor cleaners. Some harsh chemicals can irritate pet paws or be harmful if licked.
- Address accidents immediately. Pet urine can soak into wood and cause permanent staining and odor if left too long.
High Traffic Areas
- Entryways and hallways get dirtier faster. Clean these spots twice a week instead of weekly. You might use a slightly stronger cleaning solution in these areas, but still keep the mop barely damp.
- Consider placing rugs strategically. They catch dirt and protect the most worn areas.
Older or Worn Floors
- Older floors with worn finishes need gentler care. They’re more vulnerable to water damage because the protective seal is compromised.
- Clean carefully with minimal water. If your floor looks dull, has visible scratches, or shows raw wood in spots, it might need refinishing rather than just cleaning.
- Watch for these signs you need professional help: boards that feel rough, finish that’s completely worn through, deep scratches or gouges, warping or loose boards, or persistent stains that won’t come out.
- Refinishing restores the protective layer and makes cleaning easier. It’s worth the investment for badly worn floors.
Choosing the Right Products
- Quality tools and cleaners make a real difference. Here’s what to look for.
Best Mop Types
 Microfiber Floor Mop Lightweight microfiber mop with removable pads. Ideal for sealed hardwood floors. Includes extra pads for deep cleaning sessions. Disclaimer
- We may earn a commission if you buy through this link at no extra cost to you.
- Spray mops work well for wood floors. You control exactly how much solution goes on the floor, and the microfiber pads clean effectively. A microfiber mop for hardwood floors gives excellent coverage with minimal moisture.
- Flat microfiber mops with washable pads are excellent too. Buy several pads so you can change them during cleaning without stopping.
- Avoid sponge mops and traditional string mops. Both hold too much water.
Selecting Wood Floor Cleaners
- When choosing the best cleaner for hardwood floors, look for pH neutral formulas. The label should say “for hardwood floors” or “for sealed wood floors.”
- Concentrated cleaners often work better than ready to use sprays. You can control the dilution and usually save money.
- Avoid products with wax or polish. These leave buildup that makes floors look dull over time. Your floor’s finish already provides shine.
- Following is our tested and vetted floor cleaner:
 Hardwood Floor Cleaner Spray Ready to use hardwood floor cleaner for sealed wood floors. Leaves no residue and helps remove dirt, smudges, and daily buildup. Disclaimer
- We may earn a commission if you buy through this link at no extra cost to you.
Vacuum Features for Wood
- Choose a vacuum with adjustable height and brush roll control. Being able to turn off the beater bar prevents scratches.
- Hard floor attachments with soft bristles work great. Many vacuums come with special wood floor tools.
- Consider canister vacuums. They typically work better on hard floors than upright models designed mainly for carpet.
- We recommend using the following:
 Miele Boost CX1 Parquet Vacuum Cleaner Compact, powerful canister vacuum with Parquet Twister floorhead. HEPA AirClean filtration, gentle on hard floors, easy to maneuver and empty. Disclaimer
- We may earn a commission if you buy through this link at no extra cost to you.
Your Simple Maintenance Checklist
- Keeping wood floors beautiful is easy when you follow these basics.
- Daily: Sweep or vacuum high traffic areas. Wipe up any spills immediately.
- Weekly: Vacuum or sweep thoroughly. Damp mop with microfiber and wood floor cleaner. Dry any remaining moisture right away.
- Monthly: Move furniture and clean underneath. Check for any damage or wear spots that need attention.
- Yearly: Deep clean the entire floor. Inspect the finish condition and consider professional maintenance if needed.
- Clean wood floors add value and beauty to your home. With the right tools, proper technique, and regular care, your floors will stay gorgeous for decades. Remember the golden rules: keep water to a minimum, use the right products, and clean up messes quickly. Your floors will thank you. These steps summarize how to clean wood floors efficiently.
Frequently Asked Questions
Is vinegar safe for hardwood floors?
- Vinegar is acidic and can dull or damage wood floor finishes over time. While some people use it diluted, pH neutral cleaners made for wood are safer and recommended by most flooring manufacturers.
How often should I clean wood floors?
- Sweep or vacuum high traffic areas daily and the whole floor 2-3 times per week. Damp mop weekly or bi-weekly depending on traffic. Clean spills immediately whenever they happen.
Can you use steam mops on hardwood floors?
- Generally no. Steam mops use heat and moisture that can warp wood and damage finishes. Only use steam if your specific floor manufacturer explicitly approves it in writing.
What’s the best way to remove stubborn stains?
- Start with your regular wood floor cleaner and a soft cloth. For tougher stains, try a small amount of baking soda paste or rubbing alcohol on a cloth. If stains persist, they may require professional refinishing. Never use harsh chemicals or abrasive scrubbing.
Do wood floors need polish?
- Modern sealed floors don’t need polish. The polyurethane finish provides protection and shine. Adding polish creates buildup that dulls the floor and makes it harder to clean. Just clean regularly with proper products.
Q&A
Question: How can I tell what finish my wood floor has (sealed vs. oil/wax), and why does it matter?
Short answer: Your floor’s finish dictates which cleaners and how much moisture it can safely handle. Most modern floors are sealed with polyurethane or lacquer and can tolerate light, non-saturating damp mopping. Older oil- or wax-finished floors need special care—water and standard cleaners can damage them. If you’re unsure, check your flooring manufacturer’s guidance or test a small hidden area first. Until you know, stick to dry cleaning methods and gentle, non-saturating approaches.
Question: What does “damp, not wet” mopping actually look like?
Short answer: Use a pH-neutral wood floor cleaner in a spray bottle and lightly mist a small 3×3 ft section. Mop with a well-wrung microfiber pad (no dripping, no puddles), then dry immediately with a clean microfiber cloth. Work in sections and never let liquid sit. This approach is for sealed floors only—avoid string mops and any method that leaves excess water.
Question: What’s a simple maintenance routine I can follow all year?
Short answer:
- Daily: Sweep/dust high-traffic areas and wipe spills immediately.
- Weekly: Vacuum with a hard-floor attachment (beater bar off), then light damp mop sealed floors and dry right away.
- Monthly/Quarterly: Move rugs/furniture, deep clean in small sections with the right cleaner, switch dirty pads often, and rinse/dry if the product calls for it.
- Yearly: Deep clean the entire floor, inspect finish wear, and consider professional maintenance if needed.
Question: How should I handle different spills and stains without harming the finish?
Short answer: Act fast, test in a hidden spot, and blot—don’t rub. Start mild and escalate only if needed.
- Grease/oil: Blot; use a barely damp cloth with a tiny drop of dish soap; rinse and dry.
- Sticky residues: Use your regular wood floor cleaner on a damp cloth; dry thoroughly.
- Pet accidents: Blot, then use an enzyme-based cleaner made for wood floors.
- Scuffs: Rub with a tennis ball; for stubborn marks, a small amount of baking soda on a damp cloth, then wipe and dry.
- Gum/wax: Harden with ice in a bag, lift with a plastic scraper, then clean.
- Ink/dark stains: Dab with rubbing alcohol; deep stains may need professional refinishing.
Question: How do humidity and temperature affect wood floors, and what should I maintain?
Short answer: Wood moves with climate changes. Keep indoor humidity between 35%–55% and temperatures around 60°F–80°F to reduce cupping, gaps, cracking, and finish failure. Use humidifiers/dehumidifiers as needed, run exhaust fans in moisture-heavy areas, and protect entries with mats and weather stripping to buffer sudden moisture and temperature swings.