You know that fine, gritty film that shows up on windowsills and countertops after a typical home project? Traditional hardwood floor sanding can turn that into a full-house problem – especially in older Connecticut homes with lots of trim, built-ins, and finished basements that share airflow. Dustless sanding is designed to stop that mess at the source, right where the wood is being cut.
How does dustless hardwood floor sanding work?
Dustless hardwood floor sanding works by pairing professional sanding machines with high-powered dust extraction. Instead of letting sawdust blow out into the room and settle later, the sanding equipment is connected to a vacuum system that captures the majority of dust the moment it’s created. This process is essential for understanding How Dustless Floor Sanding Actually Works?.
Think of it as sanding and cleaning happening at the same time. The abrasive removes the old finish and levels the wood, while airflow pulls the dust through a sealed path into a collection unit. The goal is a cleaner home, better indoor air during the project, and a smoother finishing phase because there’s less loose debris floating around.
“Dustless” does not mean zero dust. Wood is being cut, and microscopic particles can escape in any sanding job. What a true dust-minimizing system does is dramatically reduce the dust that would normally coat your furniture, clog your HVAC returns, and linger for days.
The core components of a dustless sanding system
A real dustless setup is not a shop vac sitting in the hallway. It’s an integrated system built for floor refinishing.
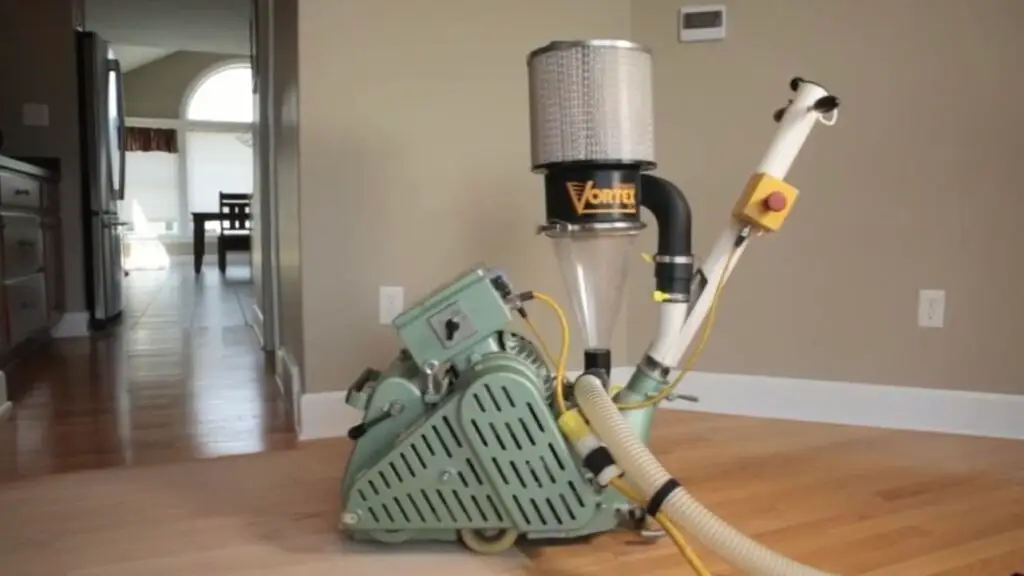
First are the sanding machines themselves – typically a drum sander or belt sander for main field areas, an edger for perimeter work, and smaller detail sanders for corners and tight spots. In dustless refinishing, these machines are designed or modified to capture dust at the point of contact, where the abrasive meets the floor.
Second is the extraction unit. This is a high-capacity vacuum or dust collector with strong suction and filtration. It’s set up to maintain steady airflow even as dust accumulates. Many systems use sealed bags or canisters and filters that trap fine particles instead of recirculating them.
Third are the hoses and seals. It sounds simple, but the difference between “less dusty” and “why is my whole house hazy?” often comes down to airtight connections, correct hose sizing, and keeping suction consistent as the crew moves room to room.
What happens during the sanding – step by step
1) Prep that protects your home (and the finish)
Before sanding starts, a professional crew will confirm what’s being refinished and what should be isolated. In a lived-in home, that usually means moving furniture, removing or protecting rugs, and planning how to manage airflow so dust doesn’t get pulled through the HVAC system.
Even with dustless sanding, responsible prep still matters. Doorways may be sealed with plastic, registers may be covered, and high-traffic paths are protected so the rest of your home stays usable.
2) The first cut removes the old finish and levels the floor
Most hardwood floors aren’t just “dull.” They’re uneven in subtle ways – finish buildup near edges, light cupping, tiny ridges from years of seasonal movement, or worn-through areas in hallways.
The initial sanding pass is where the heavy lifting happens. A drum or belt machine cuts through the existing finish and begins flattening the surface. With dustless equipment, the dust created at that sanding head is immediately pulled into the vacuum line.
If your floor has pet stains, deep gouges, or water-darkened boards, this is also the stage where a pro can see how much will sand out versus what may need board repair or replacement. Dustless sanding doesn’t change what the wood can and can’t hide – it just keeps the process cleaner.
3) Edging and detail work capture dust where traditional jobs get messy
Perimeters, under toe-kicks, and tight corners are where older sanding jobs often create the most visible dust clouds. Edgers and corner sanders can throw dust if they aren’t properly connected or if filtration is weak.
A dust-minimizing system routes that debris into extraction as well, but this is where craftsmanship shows. A clean job isn’t only about vacuum power – it’s also about consistent technique so the floor blends smoothly from field to edge without swirl marks.
4) Multiple grit steps refine the wood for a premium finish
Hardwood sanding is not one-and-done. It’s a sequence. Coarser grits remove material quickly but leave deeper scratch patterns. Finer grits remove the previous scratches and leave the wood ready to accept stain and finish evenly.
This matters for two reasons:
First, a smooth, correctly sanded floor looks richer after finishing. Light reflects evenly, grain pops the way it should, and you don’t see chatter or cross-grain scratches in sunlight.
Second, dust control supports the finishing phase. Less airborne dust means fewer nibs and specks landing in wet finish.
5) Final vacuuming and tack work set up the clean coat
After sanding, the crew will vacuum thoroughly, including edges and transitions. Some also use tack cloths or microfiber methods to pick up fine residue. This step is where dustless sanding really pays off – because there’s simply less loose debris to chase around the room.
What “dustless” really means – realistic expectations
A good dustless system captures most of the dust generated during sanding. In real homes, you may still see a light film in certain areas, especially near doorways or where people are walking in and out.
A few factors affect results:
- Floor condition: Floors with heavy finish buildup or old waxes can create finer particles.
- Home layout: Open floor plans allow more air movement, so isolating zones becomes more important.
- HVAC and airflow: Running heating or cooling can pull particles around if returns aren’t protected.
- Detail areas: Stairs, closets, and small tight spaces can be trickier to keep perfectly contained.
What you should not see in a well-run dustless job is thick dust coating furniture, piles along baseboards, or dust drifting into adjacent rooms like fog. If you’ve lived through that before, the dustless difference is immediate.
Why dust control matters for families, pets, and allergy-sensitive homes
Floor sanding creates fine particulates. The smaller the particle, the easier it is to stay airborne and travel. For households with allergies, asthma, kids playing on the floor, or pets tracking dust on their paws, keeping dust down isn’t just a convenience – it’s about comfort during the project and cleanup afterward.
Dustless sanding also helps the finish phase feel less invasive. When there’s less dust in the air, the space feels more like a managed home project and less like a construction site.
Does dustless sanding change the durability of the floor?
The durability of your refinished floor comes primarily from two things: the quality of the sanding (flatness and scratch pattern) and the quality of the finish system (product choice, coat count, cure time, and application skill). Dustless sanding supports both by improving cleanliness and consistency, but it doesn’t automatically guarantee a great result.
You still want a crew that sands evenly, repairs damage correctly, and applies finish at the right thickness with proper dry times.
Trade-offs and “it depends” situations homeowners should know
Dustless refinishing is a premium approach, and like any premium approach, it depends on the crew and equipment.
If a contractor says “dustless” but shows up with basic sanders and no real extraction, you’ll get a standard sanding job with standard mess. On the flip side, even with strong extraction, there are moments when some dust escapes – especially during bag changes, transitions between rooms, or detailed hand work.
Stain choices also matter. Very dark stains can highlight sanding imperfections. If you’re leaning dark, the sanding has to be spot-on. Dustless helps create a cleaner finish environment, but the craft has to be there.
What to expect in your home during a dustless refinishing project
Most homeowners notice three practical differences right away: the air feels cleaner, the work area looks more controlled, and post-job cleanup is faster. You’ll still want to plan for noise, foot traffic restrictions, and curing time for the finish. Refinishing is a transformation, but it’s still a real project happening inside your home.
If you’re in Connecticut and want a cleaner, professional refinishing experience with transparent pricing and no hidden fees, Dustless Hardwood Floors LLC builds its process around dust-minimizing sanding and homeowner-friendly communication – from the estimate to the final walkthrough.
The finishing step: where “clean sanding” turns into a finished floor
Once the wood is properly sanded, you’re ready for stain (optional) and protective finish. Many homeowners today prefer lower-odor, eco-friendlier options, especially when kids and pets are in the home. Product selection matters, but so does application technique and respecting cure times.
A cleaner sanding process supports a cleaner finish coat. Less dust in the space means fewer specks trapped in the topcoat and less chance you’ll feel grit under your socks. It also makes it easier for the crew to see what they’re doing – which helps them keep the final look consistent across the whole floor.
A helpful closing thought
If you’re evaluating contractors, ask them to explain their dust collection setup in plain English and describe how they protect HVAC returns and adjacent rooms. The best answer won’t be a buzzword – it’ll be a clear process that shows they respect your home as much as the floor.
Understanding how How Dustless Floor Sanding Actually Works? is crucial for maintaining a clean home during renovations.
To fully grasp How Dustless Floor Sanding Actually Works?, one must consider the technology involved.
Knowing How Dustless Floor Sanding Actually Works? prepares homeowners for a smoother experience.
Understanding How Dustless Floor Sanding Actually Works? helps you choose the right refinishing method.
It’s essential to learn how Dustless Floor Sanding Actually Works? for optimal results.
Understanding how Dustless Floor Sanding Actually Works? sets realistic expectations for the project.
Many homeowners appreciate knowing how Dustless Floor Sanding Actually Works? to avoid surprises.
For optimal outcomes, inquire about how Dustless Floor Sanding Actually Works? when selecting contractors.
Understanding how Dustless Floor Sanding Actually Works? contributes to a more efficient process.
Understanding How Dustless Floor Sanding Actually Works?
Gain insights by learning how Dustless Floor Sanding Actually Works? to enhance your refinishing experience.
Inquire about how Dustless Floor Sanding Actually Works? when considering refinishing options.
Many customers find value in understanding how Dustless Floor Sanding Actually Works? for their projects.
Discovering how Dustless Floor Sanding Actually Works? leads to fewer worries during the process.
Understanding how Dustless Floor Sanding Actually Works? enhances project satisfaction significantly.
FAQs on how Dustless Floor Sanding Actually Works? can clarify many uncertainties.
Gaining knowledge about how Dustless Floor Sanding Actually Works? is key to choosing the right team.
Understanding how Dustless Floor Sanding Actually Works? helps you to make informed decisions.
Companies knowledgeable about how Dustless Floor Sanding Actually Works? typically provide superior services.
Curiosity about how Dustless Floor Sanding Actually Works? is common among homeowners.
When professionals explain how Dustless Floor Sanding Actually Works?, you gain valuable insights.
Learning how Dustless Floor Sanding Actually Works? can reduce disruption in your home.
Understanding how Dustless Floor Sanding Actually Works? is vital for homeowners contemplating refinishing.
Finally, knowing how does dustless hardwood floor sanding work ensures you are well-prepared for your refinishing job.
In summary, understanding how does dustless hardwood floor sanding work is beneficial before any project.
If you’re considering refinishing your floors, learn how does dustless hardwood floor sanding work for the best results.
Learning how does dustless hardwood floor sanding work helps set realistic expectations for homeowners.
Understanding how does dustless hardwood floor sanding work can lead to a more thorough job.
For best results, ask how does dustless hardwood floor sanding work when researching contractors.
Many customers are pleased to find out how does dustless hardwood floor sanding work and how it reduces dust.
Understanding how does dustless hardwood floor sanding work can lead to a more efficient process.
Get informed about how does dustless hardwood floor sanding work and the benefits it offers.
When considering refinishing, understanding how does dustless hardwood floor sanding work is crucial for planning.
Customers often ask how does dustless hardwood floor sanding work and how it can improve their experience.
Learning how does dustless hardwood floor sanding work means fewer worries about cleanup and mess.
Many people benefit from knowing how does dustless hardwood floor sanding work before starting their project.
FAQs about how does dustless hardwood floor sanding work can provide deeper insights into the process.
For homeowners, understanding how does dustless hardwood floor sanding work can increase satisfaction with the results.
Learning how does dustless hardwood floor sanding work can help you choose the right contractor for your project.
Companies that specialize in how does dustless hardwood floor sanding work often have better equipment and practices.
Many people are curious about how does dustless hardwood floor sanding work compared to traditional methods.
When asking professionals how does dustless hardwood floor sanding work, you’ll discover the technology behind it.
By learning how does dustless hardwood floor sanding work, you can ensure a cleaner process with less disruption.
Understanding how does dustless hardwood floor sanding work is essential for any homeowner considering refinishing their floors.