We’ve all been there: you’ve finally removed that old carpet or vinyl flooring, ready to reveal the beautiful hardwood underneath. But this only to find a sticky, stubborn mess staring back at you. That unsightly adhesive residue can feel like a permanent stain on what should be pristine wood floors. How do you remove this stubborn glue without damaging the wood you worked so hard to uncover?
Safely and Effectively Removing Adhesive from Wood Floors can be challenging, but with the right techniques, you can achieve great results in Safely and Effectively Removing Adhesive from Wood Floors.
Understanding the importance of Safely and Effectively Removing Adhesive from Wood Floors will help you choose the right method for your specific adhesive type and ensure you are Safely and Effectively Removing Adhesive from Wood Floors.
Knowing how to Safely and Effectively Removing Adhesive from Wood Floors will save you time and effort in the process of Safely and Effectively Removing Adhesive from Wood Floors.
When considering how to Safely and Effectively Removing Adhesive from Wood Floors, be aware of the different types of adhesives involved in Safely and Effectively Removing Adhesive from Wood Floors.
Identifying Different Wood Floor Adhesives
Understanding the process of Safely and Effectively Removing Adhesive from Wood Floors can empower you as a DIYer interested in Safely and Effectively Removing Adhesive from Wood Floors.
Always remember the key to Safely and Effectively Removing Adhesive from Wood Floors is proper identification of the adhesive type to aid in Safely and Effectively Removing Adhesive from Wood Floors.
Using the right tools for Safely and Effectively Removing Adhesive from Wood Floors can make all the difference while Safely and Effectively Removing Adhesive from Wood Floors.
For tough adhesive, consider techniques for Safely and Effectively Removing Adhesive from Wood Floors that can assist in Safely and Effectively Removing Adhesive from Wood Floors.
When in doubt, refer to guides on Safely and Effectively Removing Adhesive from Wood Floors for best practices.
Safely and Effectively Removing Adhesive from Wood Floors requires patience and the right methods to ensure Safely and Effectively Removing Adhesive from Wood Floors.
In preparing for Safely and Effectively Removing Adhesive from Wood Floors, gather all necessary supplies for Safely and Effectively Removing Adhesive from Wood Floors.
The journey of Safely and Effectively Removing Adhesive from Wood Floors starts with the right mindset focused on Safely and Effectively Removing Adhesive from Wood Floors.
Essential tools for Safely and Effectively Removing Adhesive from Wood Floors include scrapers and cleaning agents crucial for Safely and Effectively Removing Adhesive from Wood Floors.
In addition to scrapers, consider methods for Safely and Effectively Removing Adhesive from Wood Floors to enhance your approach to Safely and Effectively Removing Adhesive from Wood Floors.
While using heat, remember the principles of Safely and Effectively Removing Adhesive from Wood Floors to ensure success in Safely and Effectively Removing Adhesive from Wood Floors.
Understanding solvents is key to Safely and Effectively Removing Adhesive from Wood Floors for effective application in Safely and Effectively Removing Adhesive from Wood Floors.
Be cautious when applying solvents for Safely and Effectively Removing Adhesive from Wood Floors as it impacts your success in Safely and Effectively Removing Adhesive from Wood Floors.
When tackling cleaning after Safely and Effectively Removing Adhesive from Wood Floors, select the right cleaners that aid in Safely and Effectively Removing Adhesive from Wood Floors.
For any residual adhesive, try methods for Safely and Effectively Removing Adhesive from Wood Floors that will facilitate Safely and Effectively Removing Adhesive from Wood Floors.
Post-cleaning is essential for Safely and Effectively Removing Adhesive from Wood Floors to ensure thorough Safely and Effectively Removing Adhesive from Wood Floors.
As you clean, remember the steps for Safely and Effectively Removing Adhesive from Wood Floors for effective results in Safely and Effectively Removing Adhesive from Wood Floors.
To achieve the best results in Safely and Effectively Removing Adhesive from Wood Floors, follow up with inspections that support Safely and Effectively Removing Adhesive from Wood Floors.
After completing the project, reflect on your experience Safely and Effectively Removing Adhesive from Wood Floors and consider how Safely and Effectively Removing Adhesive from Wood Floors impacted your work.
Before you start scraping or applying solvents, understanding what type of adhesive you’re dealing with is crucial. Different adhesive chemistries react completely differently to removal methods. According to flooring manufacturers and professional associations like the National Wood Flooring Association, correct identification is the foundation of successful, safe adhesive removal.
Common Types of Adhesives Found on Wood Floors
Understanding the importance of Safely and Effectively Removing Adhesive from Wood Floors can enhance future projects, ensuring successful Safely and Effectively Removing Adhesive from Wood Floors.
As you finish, think about the benefits of Safely and Effectively Removing Adhesive from Wood Floors for your next projects and how it aids in Safely and Effectively Removing Adhesive from Wood Floors.
Your success in Safely and Effectively Removing Adhesive from Wood Floors will inspire others to undertake Safely and Effectively Removing Adhesive from Wood Floors themselves.
For those needing assistance, remember the value of Safely and Effectively Removing Adhesive from Wood Floors can provide clarity on how to successfully approach Safely and Effectively Removing Adhesive from Wood Floors.
The techniques involving Safely and Effectively Removing Adhesive from Wood Floors can vary widely based on the adhesive type during Safely and Effectively Removing Adhesive from Wood Floors.
When applying your skills in Safely and Effectively Removing Adhesive from Wood Floors, focus on precision for the best outcomes in Safely and Effectively Removing Adhesive from Wood Floors.
Regular maintenance can aid in Safely and Effectively Removing Adhesive from Wood Floors in the future, ensuring a smooth process for Safely and Effectively Removing Adhesive from Wood Floors.
Be proactive in your approach to Safely and Effectively Removing Adhesive from Wood Floors.
Continue exploring methods for Safely and Effectively Removing Adhesive from Wood Floors.
As you conclude, remember to share your learnings about Safely and Effectively Removing Adhesive from Wood Floors.
Reflect on your journey in Safely and Effectively Removing Adhesive from Wood Floors.
The knowledge gained from Safely and Effectively Removing Adhesive from Wood Floors will guide future endeavors.
In summary, Safely and Effectively Removing Adhesive from Wood Floors is a skill worth mastering.
Ultimately, your success in Safely and Effectively Removing Adhesive from Wood Floors will be satisfying.
Adopting the principles of Safely and Effectively Removing Adhesive from Wood Floors can enhance your results.
Approach each task with confidence in Safely and Effectively Removing Adhesive from Wood Floors.
Stay determined in your quest for Safely and Effectively Removing Adhesive from Wood Floors.
Every effort you make contributes to Safely and Effectively Removing Adhesive from Wood Floors.
Engage fully in Safely and Effectively Removing Adhesive from Wood Floors for the best outcome.
Remember to enjoy the process of Safely and Effectively Removing Adhesive from Wood Floors.
Patience is crucial when Safely and Effectively Removing Adhesive from Wood Floors.
Success in Safely and Effectively Removing Adhesive from Wood Floors will bring you satisfaction.
In summary, mastering the art of Safely and Effectively Removing Adhesive from Wood Floors is invaluable.
Finally, the aim of Safely and Effectively Removing Adhesive from Wood Floors should always be quality.
Ultimately, success in Safely and Effectively Removing Adhesive from Wood Floors will yield lasting satisfaction.
Adopting the principles of Safely and Effectively Removing Adhesive from Wood Floors can enhance your results.
Approach each task with confidence in Safely and Effectively Removing Adhesive from Wood Floors.
For any project, strive for excellence in Safely and Effectively Removing Adhesive from Wood Floors.
Engage in conversations about Safely and Effectively Removing Adhesive from Wood Floors with fellow DIYers.
Learn from each attempt at Safely and Effectively Removing Adhesive from Wood Floors.
Remember, the goal is Safely and Effectively Removing Adhesive from Wood Floors with minimal disruption.
Success in Safely and Effectively Removing Adhesive from Wood Floors requires commitment.
Stay determined in your quest for Safely and Effectively Removing Adhesive from Wood Floors.
Ultimately, Safely and Effectively Removing Adhesive from Wood Floors is rewarding.
For the best results, prioritize Safely and Effectively Removing Adhesive from Wood Floors as a project.
Stay focused on Safely and Effectively Removing Adhesive from Wood Floors to achieve your goals.
Celebrate every small success in Safely and Effectively Removing Adhesive from Wood Floors.
Lastly, remember to share your experiences with Safely and Effectively Removing Adhesive from Wood Floors.
By following the advice on Safely and Effectively Removing Adhesive from Wood Floors, you can achieve excellent results.
Consider the importance of Safely and Effectively Removing Adhesive from Wood Floors when planning your project.
Lastly, embrace the journey of Safely and Effectively Removing Adhesive from Wood Floors as a learning experience.
Every effort you make contributes to Safely and Effectively Removing Adhesive from Wood Floors.
This knowledge is key in Safely and Effectively Removing Adhesive from Wood Floors.
Always keep in mind the goal of Safely and Effectively Removing Adhesive from Wood Floors.
Your experience in Safely and Effectively Removing Adhesive from Wood Floors can help others.
Engage with communities about Safely and Effectively Removing Adhesive from Wood Floors.
Ultimately, your success in Safely and Effectively Removing Adhesive from Wood Floors will inspire others.
Engage fully in Safely and Effectively Removing Adhesive from Wood Floors for the best outcome.
Remember to enjoy the process of Safely and Effectively Removing Adhesive from Wood Floors.
Patience is crucial when Safely and Effectively Removing Adhesive from Wood Floors.
Success in Safely and Effectively Removing Adhesive from Wood Floors will bring you satisfaction.

Finally, the aim of Safely and Effectively Removing Adhesive from Wood Floors should always be quality.
Let’s break down the most common culprits you’re likely to encounter:
Carpet Adhesive (yellow, brown, or black): Typically rubber-based or acrylic, this adhesive was used to secure carpet padding or directly adhere carpet to your wood floors. It often appears as a thick, somewhat rubbery layer.
Vinyl Tile or Sheet Adhesive (white, yellow, or black mastic): This can be water-based or solvent-based and was used for vinyl flooring installations. Important cautionary note: Older types, particularly those installed before 1980, may contain asbestos. If you suspect your adhesive is very old black mastic, stop immediately and consult a professional for testing.
For any project, strive for excellence in Safely and Effectively Removing Adhesive from Wood Floors.
Engage in conversations about Safely and Effectively Removing Adhesive from Wood Floors with fellow DIYers.
Learn from each attempt at Safely and Effectively Removing Adhesive from Wood Floors.
Remember, the goal is Safely and Effectively Removing Adhesive from Wood Floors with minimal disruption.
Success in Safely and Effectively Removing Adhesive from Wood Floors requires commitment.
Construction Adhesive (heavy-duty, often tan or gray): These industrial-strength adhesives were used for subfloor installation or repairs. They create an extremely strong bond and can be challenging to remove.
Ultimately, Safely and Effectively Removing Adhesive from Wood Floors is rewarding.
For the best results, prioritize Safely and Effectively Removing Adhesive from Wood Floors as a project.
Stay focused on Safely and Effectively Removing Adhesive from Wood Floors to achieve your goals.
Celebrate every small success in Safely and Effectively Removing Adhesive from Wood Floors.
Lastly, remember to share your experiences with Safely and Effectively Removing Adhesive from Wood Floors.
By following the advice on Safely and Effectively Removing Adhesive from Wood Floors, you can achieve excellent results.
Consider the importance of Safely and Effectively Removing Adhesive from Wood Floors when planning your project.
Lastly, embrace the journey of Safely and Effectively Removing Adhesive from Wood Floors as a learning experience.
Tape Residue (clear, sticky film): Left behind by painter’s tape, duct tape, masking tape, or other adhesive tapes. While usually easier to remove, it can be surprisingly stubborn on wood finishes.
Continue to educate yourself on Safely and Effectively Removing Adhesive from Wood Floors.
The steps you take in Safely and Effectively Removing Adhesive from Wood Floors will shape your skills.
The process of Safely and Effectively Removing Adhesive from Wood Floors can be fulfilling.
Each moment spent on Safely and Effectively Removing Adhesive from Wood Floors adds to your knowledge.
Strive for excellence in Safely and Effectively Removing Adhesive from Wood Floors.
Contact Cement (yellowish, very strong bond): Less common on entire floors but sometimes used for repairs or patches. This creates an immediate, powerful bond that requires specific removal approaches.
Gearing Up for Success: Essential Tools, Materials, and Safety
Success in adhesive removal comes down to having the right equipment and, most importantly, prioritizing your safety. Let’s walk through everything you’ll need.
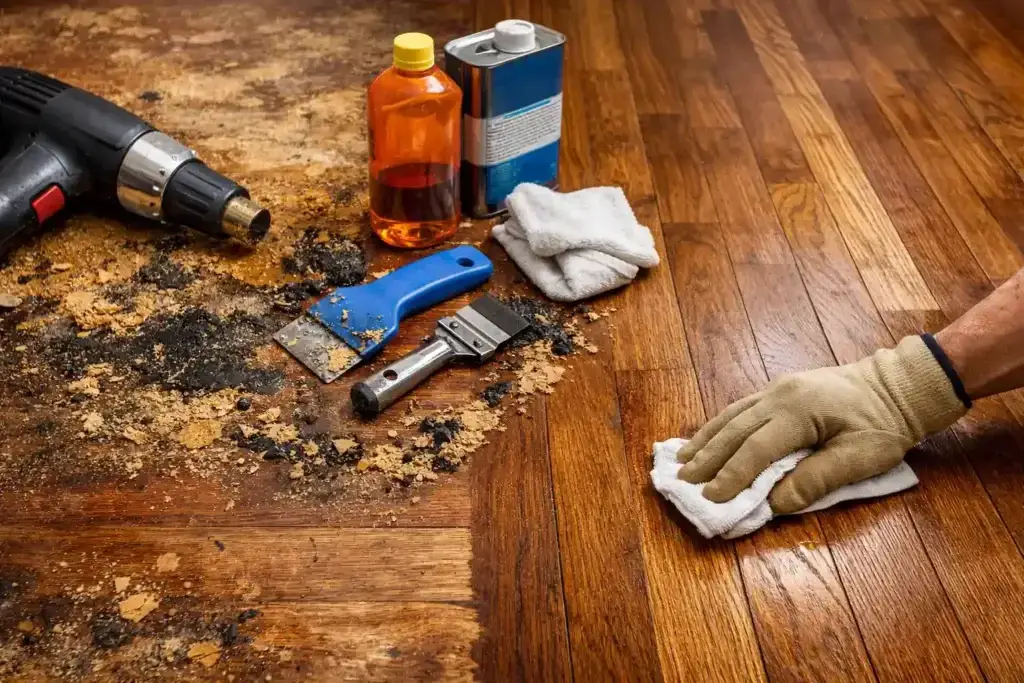
Essential Tools for Mechanical Removal
Plastic or Nylon Scrapers: We always recommend starting with these. They’re effective enough to remove softened adhesive but gentle enough to prevent gouging or scratching your wood. Keep several on hand, as they can wear down during the process.
Heat Gun (low setting): An invaluable tool for softening adhesive before scraping. The key is using it on a low setting and keeping it moving to avoid scorching your wood.
Utility Knife / Razor Scraper: For very stubborn spots, these can be effective, but use them with extreme caution. One slip can gouge your floor permanently.
Stiff Bristle Brush: Perfect for scrubbing after solvent application, helping to lift softened adhesive without damaging the wood.
Vacuum Cleaner: Essential for keeping your work area clean and removing debris between passes.
Recommended Solvents & Cleaning Agents
Mineral Spirits or Naphtha: These are effective for many petroleum-based adhesives and are our go-to starting point for solvent-based removal.
Goo Gone Pro Power (or similar citrus-based remover): Excellent for tape residue and many common glues. The citrus-based formula is often less harsh than pure chemical solvents.
Denatured Alcohol: Works well for certain adhesives, particularly shellac-based ones, and is also excellent for cleaning residue after initial removal.
Acetone (nail polish remover): Use this sparingly and only for small, very stubborn spots. Acetone can be harsh on wood finishes and should be your last resort.
Wood Floor Cleaner (pH neutral): Essential for post-removal cleaning to ensure all chemical residues are gone.
Microfiber Cloths/Rags: You’ll need plenty of these for applying solvents and wiping away residue. Buy more than you think you’ll need.
Safety First: Personal Protective Equipment (PPE)
We cannot stress this enough—protecting yourself is non-negotiable. Here’s what you must wear:
Gloves: Chemical-resistant gloves (nitrile or neoprene) protect your hands from harsh solvents and adhesives.
Eye Protection: Safety glasses or goggles prevent splashes from reaching your eyes.
Respirator Mask: This is crucial when working with solvent fumes. Choose a respirator with organic vapor cartridges, not just a dust mask.
Long Sleeves and Pants: Protect your skin from chemical exposure and provide a barrier against accidental splashes.
Critical Safety Protocols Before You Begin
Ventilation is Key: Open all windows, set up fans to create cross-ventilation, and work during times when you can keep air flowing through the space. Poor ventilation with chemical solvents is dangerous.
Fire Hazards: Keep all open flames, pilot lights, and potential spark sources far away from your work area. Solvent fumes are highly flammable.
Always Test in an Inconspicuous Area: This is absolutely crucial. Before applying any solvent or heat to your main floor area, test it in a hidden spot (like inside a closet or under furniture). Wait 24 hours to check for any damage or discoloration.
Protect Surrounding Areas: Use painter’s tape and plastic sheeting to shield baseboards, walls, and any adjacent flooring that isn’t part of your project.
Consult Material Safety Data Sheets (MSDS): For any chemical product you’re using, review the MSDS for specific handling and safety information. These documents provide crucial details about hazards and emergency procedures.
The Art of Removal: Step-by-Step Methods for Every Adhesive Type
Safely and Effectively Removing Adhesive from Wood Floors
General Principles for All Methods
Before we dive into specific techniques, keep these expert principles in mind:
Start Mild, Go Stronger: Always begin with the least aggressive method and the weakest solvent. You can always escalate if needed, but you can’t undo damage from starting too strong.
Work in Small Sections: We recommend working in 2-3 square foot sections. This prevents solvents from drying out or soaking too deeply into the wood, and it keeps the process manageable.
Avoid Over-Saturating Wood: This is critical. Apply solvents sparingly to a cloth first, then apply the dampened cloth to the adhesive. Never pour solvents directly onto your wood floor, as this can cause warping, staining, or finish damage.
Method 1: The Heat Method (Softening Adhesives)
Best For: Many types of carpet glue, vinyl glue, and general sticky residues.
Step-by-Step Process:
- Preparation: Clear the area completely and ensure you have good ventilation, even though you’re not using chemicals yet.
- Apply Heat: Set your heat gun to low and hold it 4-6 inches above the adhesive. Move it in slow, sweeping motions over a small section. You’ll see the adhesive begin to soften and become more pliable—this usually takes 30-60 seconds.
- Scrape Gently: The moment the adhesive softens, immediately use your plastic scraper to lift it away. Work with the grain of the wood when possible, holding the scraper at a shallow angle.
- Wipe Residue: Use a clean cloth to wipe away the softened adhesive as you go. This prevents it from cooling and re-hardening on the floor.
- Repeat: For thicker adhesive layers, you’ll need to work in multiple passes. Heat, scrape, wipe, then repeat on the next small section.
Expert Tip: Never leave the heat gun in one spot. Constant movement is essential to prevent scorching or discoloring your wood. If you smell burning or see smoke, you’re applying too much heat.
Method 2: The Solvent Method (Dissolving Adhesives)
Best For: Various glues, tape residues, and adhesives that don’t respond well to heat alone.
Step-by-Step Process (General Application):
- Preparation: Ensure excellent ventilation. This is even more critical with solvents. Put on all your PPE: gloves, eye protection, respirator mask, long sleeves, and pants.
- Test First: We can’t emphasize this enough. Apply a small amount of your chosen solvent to an inconspicuous area and wait at least 15 minutes (ideally 24 hours) to check for any adverse reactions.
- Apply Solvent: Dampen a clean cloth with your solvent. The cloth should be damp, not dripping. Remember: less is more.
- Dab onto Adhesive: Gently dab the solvent-dampened cloth onto a small section of adhesive. Do not pour or spray solvent directly onto the floor.
- Allow to Dwell: Let the solvent sit on the adhesive for the recommended time (check your product instructions. Usually 2-5 minutes). This gives it time to break down the adhesive’s chemical bonds.
- Scrape & Wipe: Use your plastic scraper to remove the softened adhesive, then wipe the area clean with a fresh cloth dampened with solvent. Follow up with a clean, dry cloth.
- Repeat as Needed: Continue working in small sections until all adhesive is removed.
Specific Solvent Applications:
- Mineral Spirits/Naphtha: Our first choice for petroleum-based glues and many carpet adhesives. Generally effective and less aggressive than acetone.
- Goo Gone Pro Power: Excellent for stickers, tape residue, and lighter adhesives. The citrus formula is often more pleasant to work with than pure chemical solvents.
- Denatured Alcohol: Works well for shellac-based adhesives and some glues. Also excellent for final cleaning to remove any haze.
- Acetone (Extreme Caution): Reserve this for only the most stubborn spots that nothing else can touch. Use it on a cotton swab for precise application, and wipe it away immediately. Acetone can damage finishes very quickly.
Expert Tip: Consider the age of your floors. Older finishes, particularly shellac or lacquer from pre-1960s floors, are more sensitive to harsh chemicals. When in doubt, start with the mildest option.
Method 3: Mechanical Scraping (for Brittle or Thick Adhesives)
Best For: Hard, brittle adhesives that don’t respond well to heat or solvents, or as a first step before applying other methods.
Step-by-Step Process:
- Preparation: Vacuum the area thoroughly to remove any loose debris that could scratch your floor during scraping.
- Choose Your Scraper: Always start with a plastic scraper. If you absolutely must use a metal scraper, make sure it has dulled edges (you can do this by running it along concrete).
- Angle of Attack: This is crucial—hold your scraper at a very shallow angle, almost parallel to the floor. A steep angle will gouge the wood.
- Gentle Pressure: Apply steady, light pressure and work with the wood grain whenever possible. Let the scraper do the work; forcing it will only damage the floor.
- Combine with Other Methods: We find that mechanical scraping works best when combined with heat or solvents. Use it to remove the bulk of softened adhesive, then switch to solvents for the residue.
Expert Tip: If you’re using a metal scraper, test it on a scrap piece of wood first. If it gouges the scrap easily, it will definitely gouge your floor. Dull it further or stick with plastic.
Adhesive Removal Method Comparison
| Adhesive Type | Recommended Method(s) | Pros | Cons | Key Safety Notes |
|---|---|---|---|---|
| Carpet Adhesive (rubber/acrylic) | Heat Method, Mineral Spirits/Naphtha, Goo Gone Pro Power | Effective for most formulations; less chemical-intensive with heat; solvents widely available | Can be labor-intensive; strong fumes with solvents; may require multiple passes | Good ventilation essential; full PPE (gloves, eye protection, respirator); keep away from flames (solvent fire hazard) |
| Vinyl Tile/Sheet Adhesive (mastic) | Heat Method, Denatured Alcohol, Mineral Spirits | Softens effectively with heat; can dissolve older mastics with proper solvent | May require multiple applications; strong fumes; CRITICAL: potential for asbestos in pre-1980s mastic | Full PPE, excellent ventilation; If you suspect asbestos (black mastic, pre-1980), STOP immediately and call a professional for testing; fire hazard with solvents |
| Construction Adhesive | Heat Method, Mineral Spirits/Naphtha, Mechanical Scraping | Effective for thick, stubborn areas; heat softens well; good for heavy residue | Very labor-intensive; can damage wood if not careful with scraping; may need repeated applications | Full PPE, ventilation; use careful scraping technique with shallow angle; take breaks to avoid fatigue-related mistakes |
| Tape Residue | Goo Gone Pro Power, Denatured Alcohol | Quick and effective for sticky film; minimal damage risk; relatively easy | May leave slight oily residue; less effective on thick glues; requires follow-up cleaning | Good ventilation, gloves; generally lower risk than other methods |
| Contact Cement | Denatured Alcohol, Acetone (extreme caution) | Dissolves quickly when proper solvent is used | Very strong fumes; can damage wood finish rapidly; requires immediate action | Use with extreme caution; maximum PPE (respirator with organic vapor cartridges essential); maximum ventilation; high fire hazard; test extensively first |
Note: These are general recommendations based on common adhesive types. Always test your chosen method in an inconspicuous area first. The actual time and effort required will vary based on adhesive age, thickness, and your floor’s condition.
Beyond the Stickiness: Post-Removal Cleaning, Restoration, and Protection
Removing Residual Stickiness and Haze
Even after you’ve removed the bulk of the adhesive, you’ll likely notice a slight stickiness or hazy film remaining on the wood. Here’s how we address it:
Gentle Cleaning: Wipe the entire area with a cloth dampened (not soaked) with a mild, pH-neutral wood floor cleaner. This removes surface residue and any remaining solvent.
Strive for mastery in Safely and Effectively Removing Adhesive from Wood Floors.
Denatured Alcohol for Stubborn Haze: If a haze persists, dampen a clean cloth with denatured alcohol and wipe the affected area. Immediately follow up with a damp cloth and then dry thoroughly. The alcohol will cut through the remaining residue without harming most finishes.
Deep Cleaning Your Wood Floor
After all adhesive is removed, we recommend a thorough deep clean of the entire area:
- Use your pH-neutral wood floor cleaner according to the manufacturer’s directions
- Work in sections, wiping clean as you go
- Change your cleaning water/solution frequently to avoid spreading residue
- Allow the floor to dry completely before moving to restoration
Expert Tip: This deep cleaning step is crucial before any refinishing or waxing. Chemical residues left on the floor can interfere with new finishes or cause discoloration over time.
Restoring and Protecting the Finish
Inspection: Once your floor is clean and dry, inspect it carefully in good lighting. Look for any dullness, discoloration, or minor damage that occurred during the removal process.
Re-oiling or Waxing: If your floor has an oil or wax finish, now is the time to reapply. Follow the product manufacturer’s recommendations for application. This not only restores the appearance but also provides protection.
Spot Refinishing: For areas where the finish was compromised during removal, you have options:
- For minor dullness: Buffing with a soft cloth may be sufficient
- For more noticeable damage: Consider a spot-refinishing product that matches your floor’s finish
- For significant damage: A professional may need to sand and refinish the affected area
Before and After Success: We’ve seen countless DIY projects where floors that looked hopelessly damaged by adhesive were restored to beautiful condition. The key is patience, proper technique, and thorough post-cleaning.
Continue learning about Safely and Effectively Removing Adhesive from Wood Floors for future projects.
Knowing Your Limits: When to Call in the Professionals
Engage with professionals for advice on Safely and Effectively Removing Adhesive from Wood Floors.
Approach Safely and Effectively Removing Adhesive from Wood Floors with an open mind.
Understand the importance of Safely and Effectively Removing Adhesive from Wood Floors for home improvement.
Explore various techniques for Safely and Effectively Removing Adhesive from Wood Floors to increase your knowledge.
Consult resources on Safely and Effectively Removing Adhesive from Wood Floors for additional insights.
Reflect on your experiences in Safely and Effectively Removing Adhesive from Wood Floors.
We’re strong advocates for DIY solutions, but we also believe in knowing when a project requires professional expertise. Here are the situations where we recommend calling in a certified flooring technician:
Indicators for Professional Help
Extensive Damage: If the wood itself is deeply gouged, severely stained, or warped, professional intervention is warranted. They have specialized equipment and refinishing techniques that go beyond DIY capabilities.
Very Old or Delicate Floors: Antique floors, historically significant flooring, or original finishes from the early 1900s require specialized care. These floors are irreplaceable, and mistakes can’t be undone.
Unknown or Hazardous Adhesives: If you suspect asbestos-containing mastic (common in vinyl tile glue from before 1980) or other hazardous chemicals, stop immediately. Professionals have the training, equipment, and legal authorization to handle hazardous materials safely. This is not worth the health risk.
Large Areas/Time Constraints: If you’re dealing with 500+ square feet of adhesive, the project may take weeks of DIY effort. Professionals have industrial-grade equipment that dramatically speeds up the process.
Persistent Residue/Unsatisfactory Results: If you’ve tried multiple methods and still have stubborn adhesive or unsatisfactory results, a professional can assess whether there’s an underlying issue you’re missing.
Seek resources on Safely and Effectively Removing Adhesive from Wood Floors to enhance your skills.
Benefits of Professional Service
Specialized Expertise: Professionals have encountered every type of adhesive and know the most effective removal techniques for each.
Industrial-Grade Tools: From commercial-grade heat plates to professional solvents not available to consumers, they have access to equipment that makes the job faster and more effective.
Safety Assurance: Professionals are trained and equipped to handle hazardous materials safely, protecting both themselves and your home.
Guaranteed Results: Many professional services offer warranties or guarantees on their work, giving you peace of mind.
Expert Perspective: As one certified flooring technician we consulted told us, “While many adhesive issues are DIY-friendly, knowing when to bring in a certified flooring technician can save you from costly mistakes and ensure the longevity of your beautiful wood floors.” We couldn’t agree more.
Troubleshooting Common Sticky Situations: Expert FAQs
“Why is there still a sticky residue after I thought I removed everything?”
This typically means either the solvent didn’t fully dissolve the adhesive or you haven’t completely removed the solvent itself. Try a second pass with a fresh solvent-dampened cloth, working in smaller sections and allowing more dwell time. Follow up with a pH-neutral wood floor cleaner to remove all chemical residue.
“My wood looks dull or discolored after removal. Did I damage it?”
This could be finish damage from harsh solvents, or it might simply be a lack of post-cleaning. First, try gentle buffing with a soft cloth. If that doesn’t help, consider re-applying wax or oil appropriate for your floor type. For more significant discoloration, you may need spot refinishing. If you used a very harsh solvent like acetone, some finish damage is possible—this is why we always recommend testing first.
“The adhesive just won’t budge no matter what I try!”
This calls for a strategic reassessment. First, re-evaluate the adhesive type—you may have misidentified it. Try a different, stronger solvent (with appropriate caution and testing). Consider combining methods: use heat to soften, then immediately apply solvent, then scrape. If nothing works, the adhesive may be a specialized industrial type that requires professional-grade removal techniques.
“I accidentally scratched my floor while scraping. What now?”
For minor, shallow scratches, wood repair kits or touch-up pens that match your floor color can work well. Apply according to product directions and then refinish the spot. For deeper gouges that penetrate through the finish into the wood, professional repair may be necessary. This might involve filling, sanding, and refinishing the damaged area.
“How do I dispose of solvent-soaked rags?”
This is a critical safety question—thank you for asking. Rags soaked in solvents like mineral spirits, naphtha, or acetone can spontaneously combust due to the heat generated during the evaporation process. Here’s the safe disposal method:
- Spread the rags out flat on a non-combustible surface outside (concrete, metal, etc.)
- Keep them away from buildings, vegetation, and anything flammable
- Allow them to air dry completely—this can take 24-48 hours
- Once fully dry, they can be disposed of with regular trash, or better yet, take them to your local hazardous waste collection facility
Never bundle wet solvent-soaked rags together or throw them in a trash can while still damp. This creates the perfect conditions for spontaneous combustion.
Making the Call: DIY vs. Professional Cost & Time Analysis
Let’s talk honestly about what this project will cost and how long it will take, because these factors heavily influence whether DIY or professional services make sense for your situation.
DIY Cost Breakdown
Tools (one-time purchases):
- Plastic scrapers (set): $10-20
- Heat gun: $25-60 (if you don’t already have one)
- Utility knife/razor scraper: $5-15
- Stiff bristle brush: $8-15
- Subtotal for tools: $50-110
Materials (consumable):
- Mineral spirits or naphtha (quart): $8-15
- Goo Gone Pro Power or citrus remover: $10-20
- Denatured alcohol (quart): $10-18
- Wood floor cleaner: $8-15
- Chemical-resistant gloves: $5-10
- Respirator with organic vapor cartridges: $25-40
- Safety glasses: $5-15
- Microfiber cloths/rags: $10-20
- Painter’s tape and plastic sheeting: $10-15
- Subtotal for materials: $90-170
Estimated Total DIY Cost: $140-280 (less if you already own some tools)
For a typical 200 square foot room, your costs will be at the lower end. For larger areas, you’ll need more solvents and consumables, pushing costs toward the higher end.
Professional Service Cost Estimates
Professional adhesive removal costs vary significantly based on several factors:
Factors Influencing Cost:
- Area size (larger areas often have lower per-square-foot rates)
- Adhesive type (hazardous materials like asbestos-containing mastic cost more)
- Floor condition (damaged floors requiring repair add to the cost)
- Regional rates (urban areas typically cost more)
- Additional services (refinishing, deep cleaning, etc.)
Estimated Costs:
- Per square foot: $2-8 for standard adhesive removal
- Minimum service charge: Most professionals have a $200-400 minimum
- Small room (100-200 sq ft): $300-800
- Medium room (300-400 sq ft): $600-1,600
- Large area (500+ sq ft): $1,000-4,000+
- Hazardous material removal (asbestos): Significantly higher, often $2,000-5,000+ depending on area
Time Investment Comparison
DIY Time Investment:
Let’s be realistic—adhesive removal is time-consuming, especially for beginners:
- Small area (50-100 sq ft): 4-8 hours of active work
- Medium area (200-300 sq ft): 10-20 hours spread over multiple days
- Large area (500+ sq ft): 30-60+ hours
This doesn’t include prep time, cleanup, and the learning curve of figuring out what works. You’ll also need recovery time between sessions—this is physically demanding work.
Professional Time:
- Small area: 2-4 hours
- Medium area: 4-8 hours (often completed in one day)
- Large area: 1-3 days
Professionals work much faster due to experience, specialized equipment, and the efficiency that comes from doing this regularly.
Weighing Your Options
When DIY is Ideal:
- You’re working with a smaller area (under 200 square feet)
- You’ve clearly identified the adhesive type and it’s not hazardous
- You’re budget-conscious and have the time to invest
- You genuinely enjoy hands-on projects and learning new skills
- The adhesive is relatively recent and not heavily deteriorated
- Your floor is in good condition with a durable finish
When Professional Service is Preferred:
- You’re dealing with 500+ square feet
- You suspect hazardous materials like asbestos
- Your floors are antique, delicate, or historically significant
- You’re on a tight timeline (moving, selling, renovating)
- You’ve attempted DIY removal without satisfactory results
- The floor needs refinishing anyway (professionals can do both)
- You want guaranteed, insured results
The Middle Ground:
Consider a hybrid approach: hire a professional for an initial consultation. Many will assess your situation for a modest fee ($50-150) and can:
- Identify the adhesive type definitively
- Test for hazardous materials
- Recommend the best approach
- Give you a professional quote
Then you can make an informed decision about DIY versus hiring them for the full job.
Final Polish: Enjoying Your Flawless Wood Floors
Congratulations! Whether you’ve just completed your adhesive removal project or you’re planning your approach, you now have the comprehensive knowledge to restore your wood floors successfully.
Recap of Key Takeaways
Let’s review the essential principles that will ensure your success:
Identification is paramount. Taking the time to correctly identify your adhesive type prevents wasted effort and potential damage. When in doubt, test multiple approaches in inconspicuous areas.
Safety should always be your top priority. The money you save on DIY isn’t worth a health emergency. Always use proper PPE, ensure adequate ventilation, and handle chemicals responsibly.
Start with the least aggressive method. You can always escalate your approach, but you can’t undo damage from starting too strong. Patience pays off in the long run.
Persistence pays off. Adhesive removal rarely happens in one pass. Expect to work through multiple rounds of heat, solvent, scraping, and cleaning. Each pass gets you closer to your goal.
Don’t hesitate to call a pro when needed. There’s no shame in recognizing when a project exceeds DIY scope. Professionals exist for a reason, and sometimes their expertise is the most cost-effective solution.
Long-Term Floor Care
Now that your floors are restored, here’s how we recommend keeping them beautiful:
Regular Cleaning:
- Sweep or vacuum weekly to prevent dirt and grit from scratching the finish
- Mop with a pH-neutral wood floor cleaner monthly
- Address spills immediately to prevent staining or water damage
- Use only products specifically designed for wood floors
Preventive Measures:
- Place felt pads under all furniture legs to prevent scratches when moving pieces
- Use area rugs in high-traffic zones and entryways
- Remove shoes or use indoor slippers to reduce floor wear
- Maintain consistent indoor humidity (30-50%) to prevent wood expansion and contraction
- Reapply protective finish (wax, oil, or polyurethane) according to manufacturer recommendations
Preventing Future Adhesive Problems:
- When using tape on floors, choose painter’s tape and remove it within 24 hours
- If installing temporary flooring, use products specifically designed to be removable
- Place protective barriers under any adhesive-backed items
- If you must use adhesive, choose products labeled as “easy release” or “removable”
Your Success Story
You’ve transformed what seemed like an impossible sticky mess into beautifully restored wood floors. Every time you walk across that smooth, clean surface, you’ll feel the satisfaction of a job well done. Your floors now showcase the natural beauty of the wood, free from the ghost of old flooring installations.
We’d love to hear about your experience! What methods worked best for you? Did you encounter any unexpected challenges? Your insights could help fellow DIYers facing similar projects.
If you have questions as you work through your project, don’t hesitate to consult with flooring professionals, reach out to online DIY communities, or revisit this guide. Remember—every stubborn adhesive removal project teaches you something new, and patience combined with the right techniques always wins in the end.
Here’s to your flawless wood floors—enjoy every beautiful, adhesive-free square foot!