How We Erased Years-Old Dog Urine Stains from Hardwood
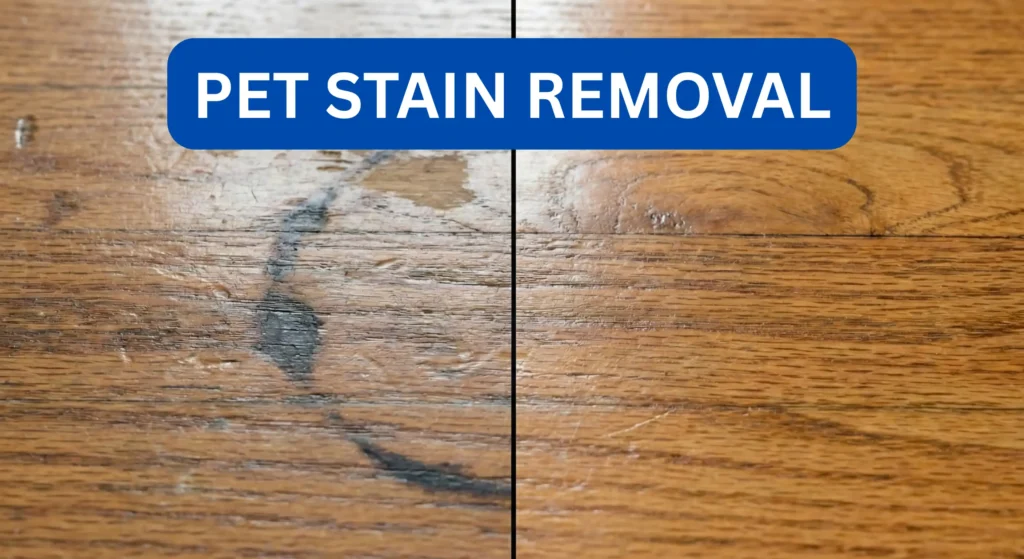
We’ve restored many hardwood floors over 14 years, but every now and then we come across a case that challenges everything we know. This one started with a homeowner standing over a cluster of dark, shadowy stains in their living room. There were marks left behind by an elderly dog who’d been having accidents for months. The smell was sharp, sour, and unmistakable. The stains were blackened down to the grain. And the fear in the owner’s voice was the same fear we hear from countless pet lovers:
In our experience, learning How We Erased Years-Old Dog Urine Stains from Hardwood requires patience and the right methods.
“Is my floor ruined forever?”
We know that How We Erased Years-Old Dog Urine Stains from Hardwood isn’t just about cleaning; it’s about restoration.
We get it. Nothing is more discouraging than watching your beautiful hardwood floor begin to look and smell like permanent damage. And the worst part? Most people try everything before they call us, only to feel like they’ve made zero progress. Online hacks fail. Store-brand cleaners barely dent the problem. Odor comes back at the slightest hint of humidity. And those dark circles? They feel like a lifetime sentence.
Understanding How We Erased Years-Old Dog Urine Stains from Hardwood involves knowing the challenges.
We’ve been there too.
That’s why we documented this restoration so thoroughly. So we could show the exact multi-stage journey we took, why it worked, and what truly makes the difference between a temporary fix and a real solution.
This is the story of how we brought a deeply damaged oak floor back from the brink.
Understanding the Battle We Were Walking Into

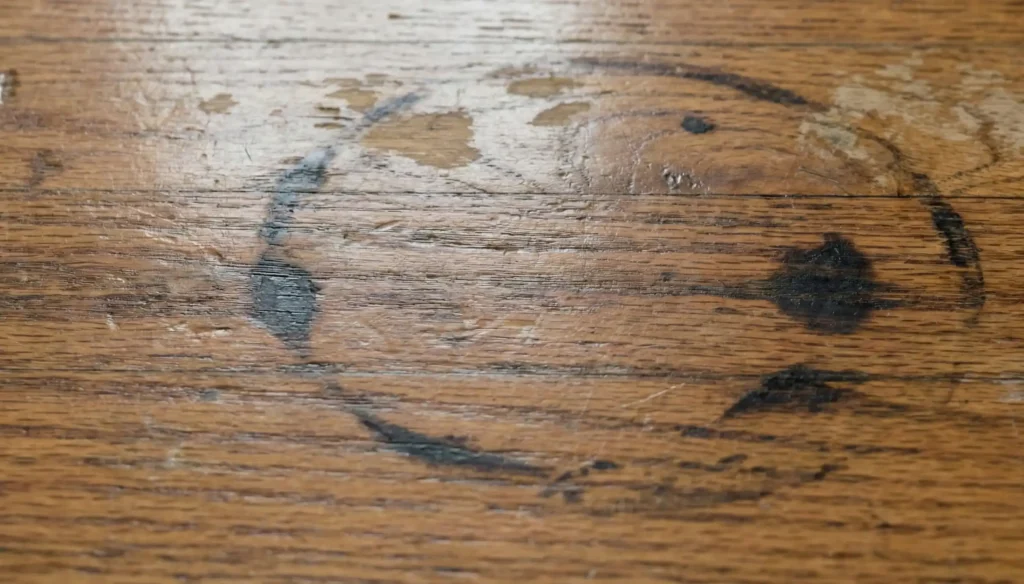
Before we touched a single tool, we had to understand the real challenge. The floor was original 50-year-old red oak with a tired, thinning polyurethane finish. This type of surface absorbs accidents like a sponge. The stains weren’t new; they had been building quietly over time as the dog’s health declined.
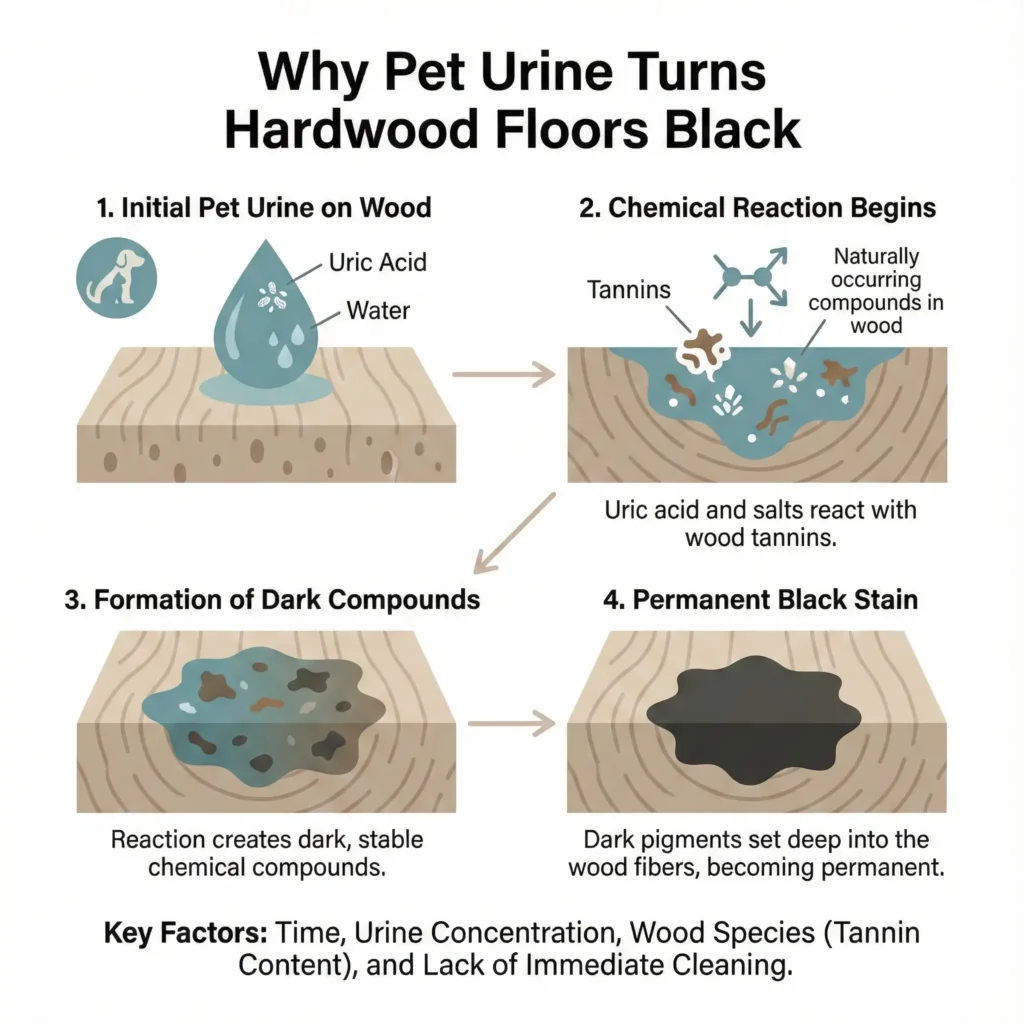
When urine sits, it doesn’t just leave a mark, it changes the wood. The acidic compounds react with the tannins in oak, creating those black rings that seem welded into the grain.
The process of How We Erased Years-Old Dog Urine Stains from Hardwood is methodical and thorough.
Ultimately, How We Erased Years-Old Dog Urine Stains from Hardwood requires a deep understanding of wood.
In the end, How We Erased Years-Old Dog Urine Stains from Hardwood is about restoring beauty and health.
The odor problem? That’s a whole different beast.
As urine dries, uric acid crystals form deep inside the wood fibers. These crystals reactivate with moisture and continue releasing ammonia and mercaptan odors long after the surface looks “clean.”
This wasn’t a quick wipe-down job.
This was going to be a multi-stage, deliberate, patient recovery.
The First Clue: Seeing the Invisible
In this post, we will share our journey and the techniques we used in the process of How We Erased Years-Old Dog Urine Stains from Hardwood.
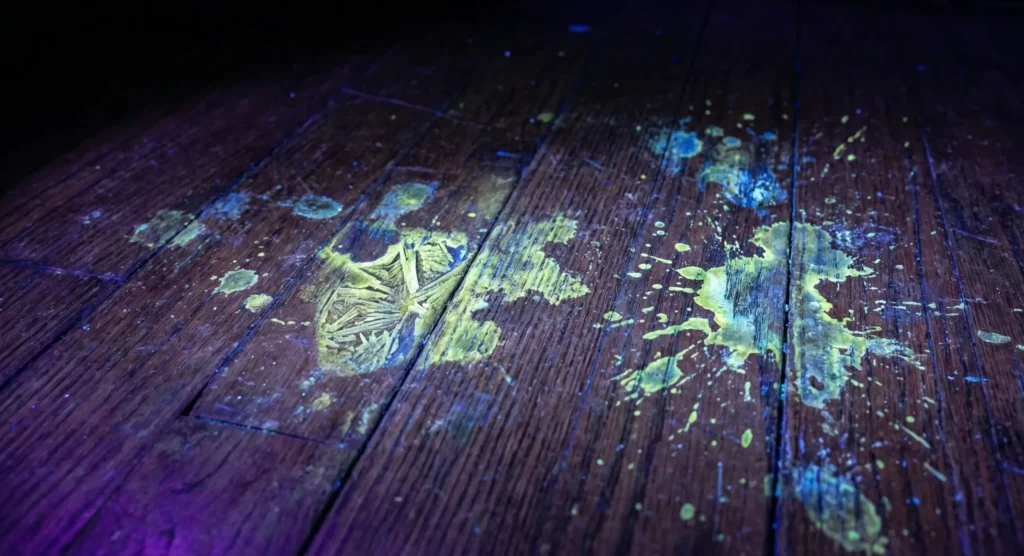
We always start with our eyes, but for pet urine, the naked eye lies. So we turned on the UV black light, darkened the room, and let the truth reveal itself.
Immediately, the floor lit up like a constellation.
Spots no one even knew were there fluoresced in neon patches.
Then we brought out the moisture meter. Fresh-looking wood can still be saturated underneath. Sure enough, readings were elevated exactly where the dog had repeatedly rested.
The owner sighed when they saw the scope of it.
But we weren’t discouraged. We just needed a plan that respected how deep the problem went.
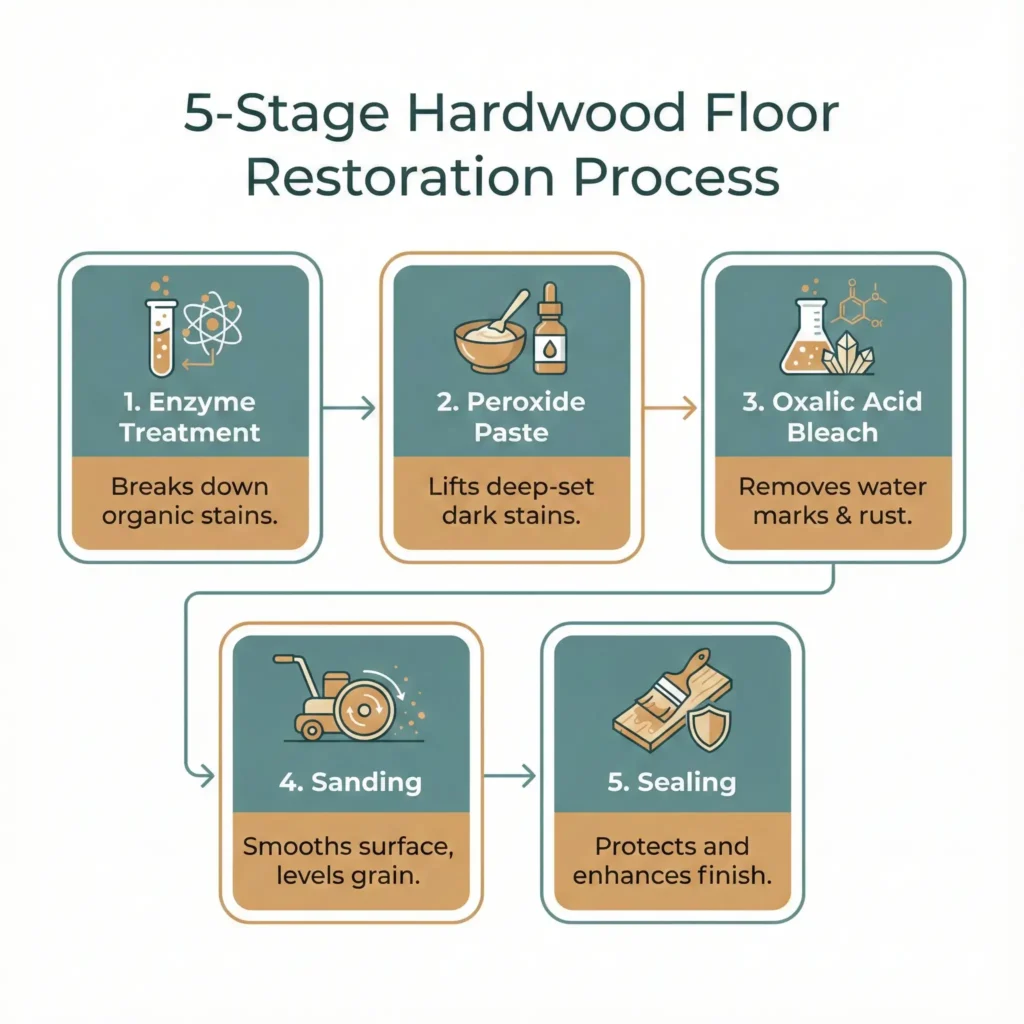
Phase 1: Letting Enzymes Do the Work Nature Designed Them to Do
Our first step was to tackle the organic compounds. The part of urine that bacteria feed on, multiply from, and transform into those persistent odors.
We saturated the affected areas with a high-quality enzymatic cleaner and immediately covered each treated zone with plastic wrap. This step matters more than people realize. Enzymes need time. Drying stops the reaction, so we trapped moisture in to keep them alive and working.
We left it for 24–48 hours, checking periodically, reapplying where needed, and blotting up the moisture that wicked to the surface. Slowly, the smell began to soften.
But the black stains?
They barely budged.
We expected that.
Enzymes erase odor at a molecular level, but deep discoloration needs a different kind of chemistry.
Phase 2: Coaxing Out the Stain with Peroxide & Baking Soda
Next, we mixed hydrogen peroxide (3%) with baking soda to create a gentle bleaching paste. We spread it over the darkest rings, layered paper towels on top, and sealed everything under plastic. This phase is where we usually see the first visible progress.
Overnight, the paper towels drew tinted moisture upward.
The black softened slightly to a dark brown.
And the peroxide brightened part of the discoloration.
But this stain was old. Deep.
Stubborn in the way that only years-old pet accidents can be.
We knew this step would help, but we also knew it wouldn’t finish the job.
Phase 3: Bringing Out the Big Gun: Oxalic Acid
Wood bleach (oxalic acid) is powerful, and we use it carefully. When handled correctly, it breaks the chemical bonds responsible for those black tannin reactions.
We mixed a fresh batch, applied it only on the darkest sections, and monitored it closely. Within the first hour, we started to see the magic:
The blackness dissolved into a light tea-brown.
Then softer.
Then closer to the natural tone of the surrounding oak.
Once we reached the sweet spot, we neutralized the area with a baking-soda wash and rinsed it thoroughly.
Success in How We Erased Years-Old Dog Urine Stains from Hardwood is marked by the homeowner’s satisfaction.
For the first time since we started, the homeowner could see genuine hope.
Not perfection yet. But real, measurable progress.
Phase 4: Erasing the Last Traces: Light Hand Sanding
Now that we’d handled the chemistry, we needed to unify the appearance. With fine-grit (120–220) sandpaper and #0000 steel wool, we carefully feather-sanded only the treated zones.
Careful application of techniques leads to success in How We Erased Years-Old Dog Urine Stains from Hardwood.
Many homeowners learn from How We Erased Years-Old Dog Urine Stains from Hardwood to prevent future issues.
The result of How We Erased Years-Old Dog Urine Stains from Hardwood is a beautiful floor.
We believe that How We Erased Years-Old Dog Urine Stains from Hardwood is achievable with the right tools.
Dust cleared.
Color evened out.
The floor started resembling one continuous piece again.
Sharing the story of How We Erased Years-Old Dog Urine Stains from Hardwood brings awareness to others.
Phase 5: Sealing the Victory
Bare, freshly treated hardwood is vulnerable, so we finished with multiple thin coats of a high-quality polyurethane.
Each layer cured for the recommended time.
Each layer brought back depth, sheen, and protection.
Each layer made the homeowner smile wider.
By the time the final coat settled, the floor didn’t just “look better”…
It looked normal again.
Like nothing had ever happened.
And the smell? Gone! Completely and measurably gone.
What We Learned Along the Way
Every floor teaches us something new, and this one reinforced some truths worth sharing:
- Patience matters more than any single product.
- Deep-set stains require a combination of enzyme action + oxidation + wood bleaching.
- Odor doesn’t live on the surface. It lives in the grain.
- Testing every chemical on a hidden area is non-negotiable.
- Black light and moisture meters are your best allies.
- Enzymes need time, rushing them kills their effectiveness.
- Over-sanding is far more dangerous than under-sanding.
- No single “magic solution” exists. Anyone claiming otherwise is selling a shortcut that doesn’t work.
When DIY Isn’t Enough
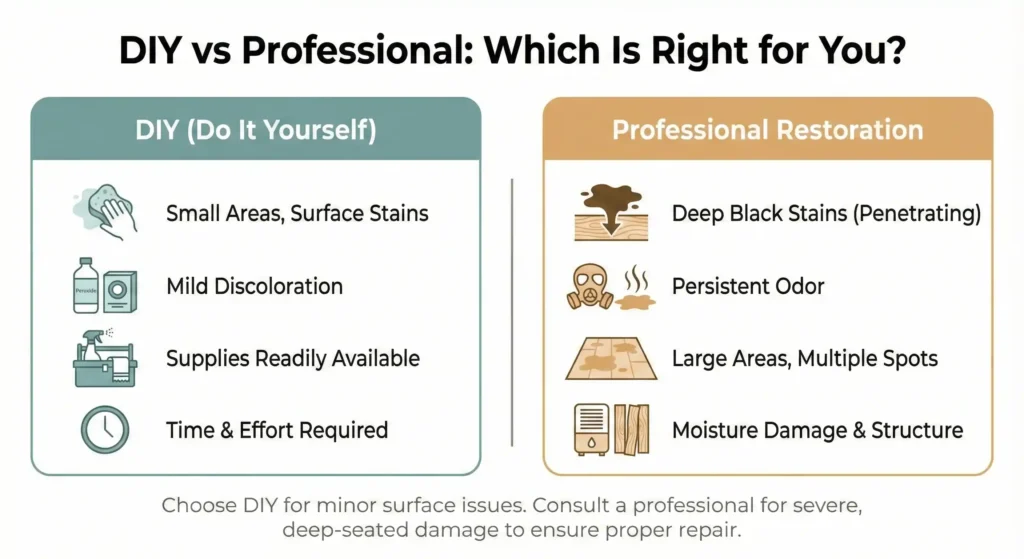
We love empowering homeowners, but we’re also honest:
Not every stain can be fixed alone.
If you smell ammonia weeks after cleaning…
If your stains are pitch black and well-established…
If the wood feels soft or warped…
Or if the damage spans a large area…
It may be time to call in a professional restoration team.
Hardwood is too valuable to gamble with.
Keeping Your Floors Safe Going Forward
The best cure is prevention. Here’s what we always recommend for pet-loving households:
- Stick to a consistent potty schedule.
- Have senior pets checked for incontinence issues.
- Use waterproof mats where spills happen frequently.
- Seal or refinish your floor regularly for a protective barrier.
- Always blot. Never rub fresh accidents.
- Use enzymatic cleaners immediately, even for small spots.
These habits will save your floor from future headaches.
Join us in the journey of How We Erased Years-Old Dog Urine Stains from Hardwood.
The Ending We All Wanted

Our experiences shape our understanding of How We Erased Years-Old Dog Urine Stains from Hardwood.
With determination, How We Erased Years-Old Dog Urine Stains from Hardwood can be achieved by anyone.
When we finally stepped back and looked at that restored oak floor, the relief on the homeowner’s face said everything. The black stains were gone. The odor had disappeared. The wood grain looked clean, bright, and healthy again.
And most importantly?
They got their peace of mind back.
That’s why we do what we do.
Not just to fix floors, but to make homes feel whole again.
If you’re facing the same battle, know this:
It’s not hopeless. With the right methods, patience, and a little guidance, your hardwood floors can make a comeback too.
And we’re here to help you every step of the way.

Need Hardwood Floor Refinishing or Stain Removal for your floor? Reach us now, and get free estimates. (Currently serving Connecticut.)
Contact UsImportant Considerations & Disclaimer
Every hardwood floor situation is unique. Wood species, finish types, stain age and severity, environmental conditions, and dozens of other variables affect treatment outcomes. While we achieved excellent results with our approach, we cannot guarantee identical results for every situation.
The methods we documented involve chemicals that require careful handling. Oxalic acid wood bleach, in particular, is caustic and potentially dangerous if misused. Always follow manufacturer instructions precisely, wear appropriate personal protective equipment, ensure adequate ventilation, and never mix chemicals unless specifically instructed.
Test every product on an inconspicuous area before applying it to visible floor areas. What worked safely on our red oak with polyurethane finish might react differently with your specific wood species or finish type.
If you feel uncomfortable or uncertain at any point, there’s no shame in consulting a professional. We successfully completed this restoration ourselves, but we also researched extensively, proceeded carefully, and had some prior experience with home improvement projects. If you lack confidence in your ability to safely use the chemicals involved or execute the techniques properly, professional flooring restoration specialists can help.
We constantly refine our approach on How We Erased Years-Old Dog Urine Stains from Hardwood.
Ultimately, How We Erased Years-Old Dog Urine Stains from Hardwood is about restoring joy.
Every success story in How We Erased Years-Old Dog Urine Stains from Hardwood inspires us.
We want to emphasize that How We Erased Years-Old Dog Urine Stains from Hardwood can be accomplished.
Documenting How We Erased Years-Old Dog Urine Stains from Hardwood helps others learn.
The journey of How We Erased Years-Old Dog Urine Stains from Hardwood is one of perseverance.
We believe in the power of How We Erased Years-Old Dog Urine Stains from Hardwood to change lives.
Every homeowner can benefit from How We Erased Years-Old Dog Urine Stains from Hardwood.
We stand behind the promise of How We Erased Years-Old Dog Urine Stains from Hardwood.
With every case, How We Erased Years-Old Dog Urine Stains from Hardwood becomes more possible.
For extensive damage, very old or valuable floors, or situations where DIY methods prove insufficient, professional assessment and treatment may be the wisest investment. Professionals have access to specialized equipment and products not available to consumers, along with experience that helps them navigate complex situations.
Our goal in sharing this case study is to educate and empower, not to provide a guarantee. Take the insights, understand the chemistry, apply the techniques carefully, and adjust based on your specific situation. With patience, proper methods, and realistic expectations, you can achieve dramatic improvements in even severely damaged hardwood floors.
Your floors held beauty beneath the damage. With the right approach, you can reveal it again.